
- Online video downloader
- Streaming Products
- BD-DVD products
- Store
- Useful Articles
- support
Share this article!


On online platforms like Yahoo! Answers, you often see people asking how to record Disney+ content. Therefore, this article will detail four of the easiest recording methods so you can enjoy your favorite Disney content anytime, anywhere. Furthermore, we'll explain fundamental solutions for when recording fails, so please read to the end.

Related Posts:
While Disney+ offers a download function, many people wonder, "Why bother recording?" In reality, the official download function has several limitations, which leads many users to consider recording for later use. The main reasons for this include the following restrictions:
Main limitations of the official download feature
Recording and saving Disney+ content bypasses various restrictions of the official download function, allowing you to freely play saved videos anytime. However, there are several points to keep in mind before recording Disney+. Before introducing each method, let's understand the following points.
Points to note when recording Disney+
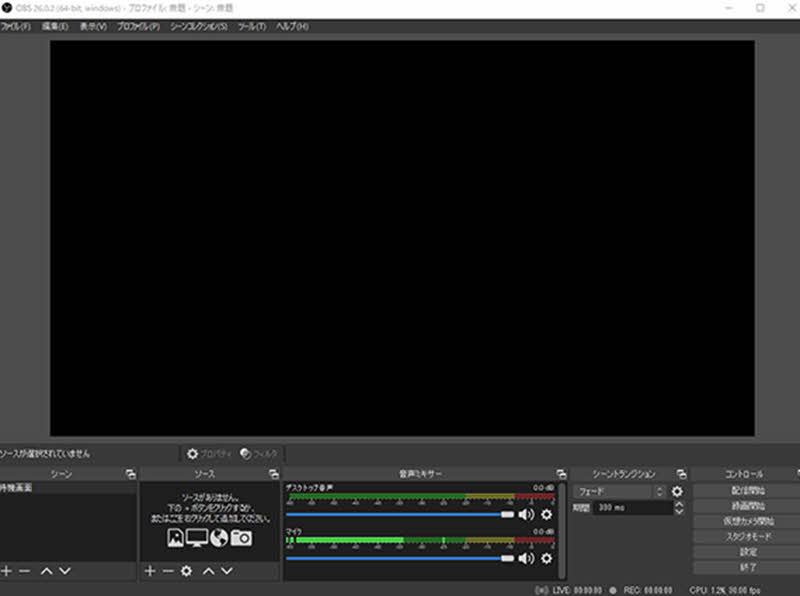
OBS Studio is a free, open-source recording and streaming software that offers advanced features and detailed recording settings. It's a highly recommended method for recording Disney+ on your PC, as it allows for easy recording in high quality.
However, OBS Studio has few beginner-friendly guides, and because it has so many features, it takes some time to learn how to use it. Also, depending on your computer's performance, it may run slowly, so you should pay attention to your computer's specifications.
This guide explains, step by step, how to record Disney+ content using OBS Studio.
step 1Launch OBS Studio,"Screen capture"Add it as a new source. Select the Disney+ playback screen you want to record, and adjust the recording range and audio settings as needed.
Step 2Play the Disney+ video you want to record, and when you're ready..."Start recording"Click the button to start recording.
Step 3When ending the recording,"Stop recording"Press the button. After recording is complete, the video file will be automatically saved to the previously specified save folder.
Advantages:
Cons:
If you want to record Disney+ on your PC without installing additional recording software, you can use extensions for Google Chrome such as "Screenity" or "Screen Recorder." These extensions allow you to record Disney+ video directly in your browser, making them simpler to set up and easier to use for beginners compared to high-functional recording software like OBS Studio.
However, browser extensions are susceptible to changes in browser specifications and updates, and may suddenly become unusable. Also, they often have limited features for adjusting recording quality and editing, making them unsuitable for serious recording purposes. They are best suited for simple recording tasks.
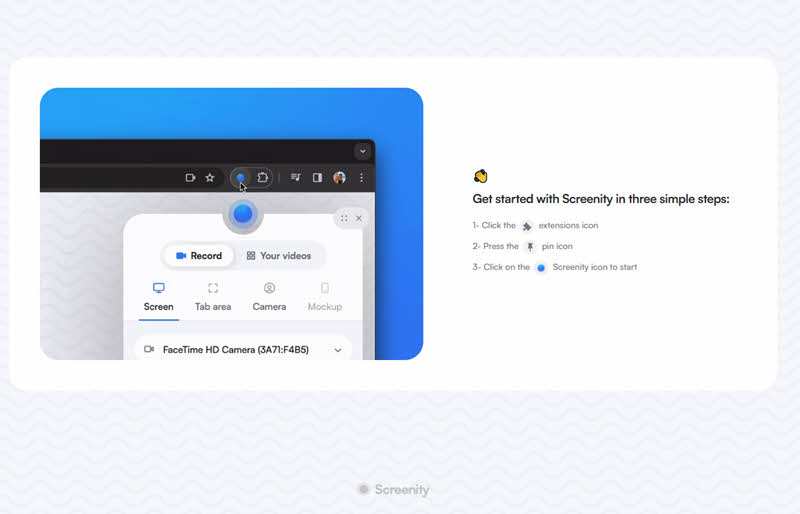
Now, let's use "Screenity" as an example to show you how to record Disney+ using an extension.
Step 1Next, install "Screenity" from the Google Web Store. After installation, in your browser...List of extensionsYou can confirm that "Screenity" is available from there.
Step 2With Disney+ displayed,screenityLaunch the application and select the screen or tab you want to record. When you finish recording,Finish RecordingYou can stop it with the " button, so after checking the settings,Start RecordingClick the button to start recording.
Step 3If you want to end the recording, sayFinish RecordingClick the "Stop" button. Once recording stops, the saved video will be automatically saved to your computer.
Advantages:
Cons:
Even if you don't have a computer handy, you can record Disney+ videos using your smartphone's built-in screen recording function. Whether you're using iOS or Android, if your device is relatively new, you can use the standard "screen recording" function. The advantage is that you don't need to install any additional apps, making it easy to record.
However, the standard recording function on smartphones has few settings options, and the image quality after recording is somewhat low. Also, depending on the device, audio may not be recorded, so please be careful when using it.
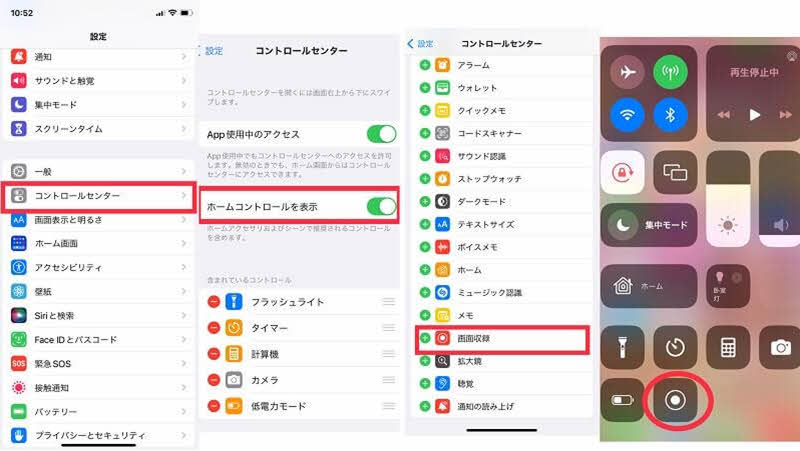
This guide explains the basic steps for recording Disney+ content using the screen recording function built into iPhones.
Step 1,first"settingOpen the app,Control CenterFrom the menu of "Screen RecordingI'll add this: This will allow you to quickly access the recording function.
Step 2Once you're ready, launch the Disney+ app and start playing the show you want to record. Advance to the current playback position before proceeding to the next step.
Step 3Display the Control Center and sayScreen RecordingTapping the "" icon will start recording. To stop recording, tap the same icon again or stop it from the recording bar at the top of the screen.
Advantages:
Cons:
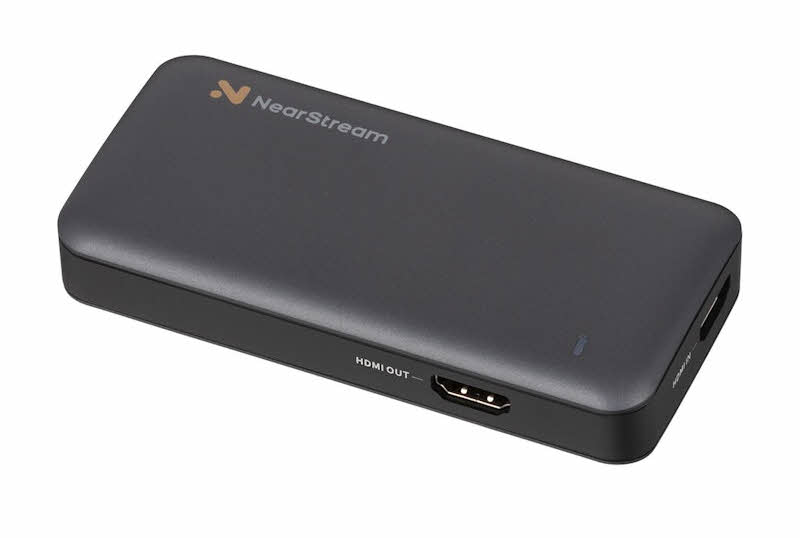
If you're watching Disney+ on a gaming console like a PS5 or Xbox Series X, using a capture card is one of the relatively stable recording methods available.
A capture board is a device that captures video and audio signals from game consoles, PCs, and other devices, and outputs them to a computer for recording and streaming. Therefore, it enables high-quality video and audio recording and is widely used for game streaming and capturing external video.
However, using a capture card incurs equipment purchase costs, and also has the disadvantage of somewhat complicated wiring and initial setup.
This guide outlines the basic steps for recording Disney+ using a capture card. For a smoother recording process, it's recommended to have an HDMI cable and recording software such as OBS Studio ready beforehand, in addition to the capture card itself.
Step 1Connect the playback device and the capture board with an HDMI cable, and then connect the capture board to the computer with a USB cable.
Step 2Launch recording software such as OBS Studio,Video capture deviceSelect the capture card as the default. Then, adjust the resolution and audio settings as needed.
Step 3Play the Disney+ video on the playback device, and in OBS, select "Recording startedClick "" to start recording. After you're finished, click "Stop recordingYou can save it by pressing the " " button.
Advantages:
Cons:
Sometimes, problems occur when trying to record Disney+ content. Many people are troubled by this issue. There are various reasons why Disney+ might fail to record, but the most common is...DRM protectionOther factors such as the capture method used by the recording software and the accumulation of cache data can also have an impact. Therefore, we have summarized some common causes in the table below for your reference.
| cause | Common symptoms | How to check |
| DRM protection | The recorded video only has audio, and the screen is completely black. | Check if the content is protected by copyright. |
| Recording software capture method | Only a specific window turns completely black. | Try recording with different capture methods |
| Cache Accumulation | The recording is choppy and the screen goes completely black. | Check your device's storage capacity |
| Temporary device/server malfunction | The screen suddenly goes black while recording. | Check if the terminal/server is working properly |
| Hardware acceleration related | GPU usage is extremely high | Check if hardware acceleration is enabled |
Up to this point, we've introduced four carefully selected methods for recording Disney+ content, detailing their features, advantages and disadvantages, and recommended usage scenarios. However, when actually trying to record Disney+, you may encounter problems where recording fails. One of the biggest troubling issues for many users is the DRM protection used by Disney+. As a result, even if the recording itself appears successful, when you play back the saved video, you often find that only the audio is recorded, and the video is completely black.
If you want to fundamentally avoid such problems,StreamByte for VideoConsider using "[Software Name]". This software is a video saving tool that supports various video streaming services, and it can save Disney+ videos in common formats such as MP4 while avoiding recording problems caused by DRM protection. In addition, unlike regular screen recording, it saves videos while maintaining the image and sound quality as much as possible, so there is less worry about image degradation and frame drops that often occur during recording, resulting in a more comfortable viewing experience.
Why StreamByte for Video is recommended
Here, we will use "StreamByte for Video".Download Disney+ to your computerHere's how to do it.
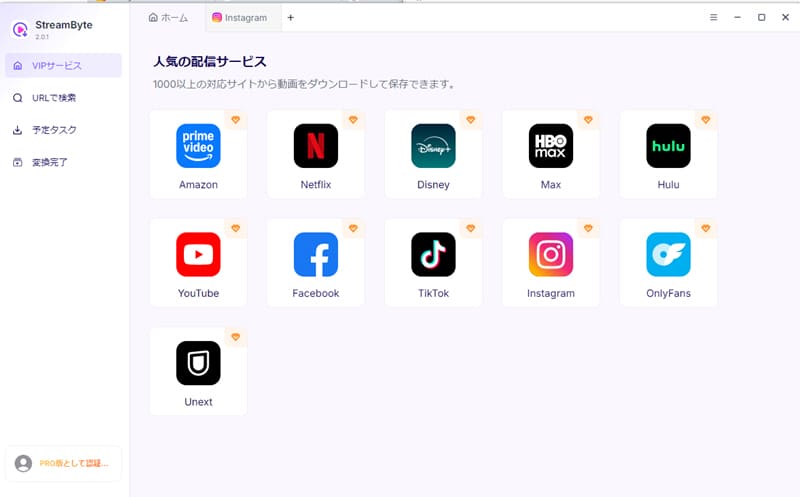
Step 1"StreamByte for Video"RegistrationNext, select "Disney+" from the list of streaming services displayed on the main screen and log in with your Disney+ account.
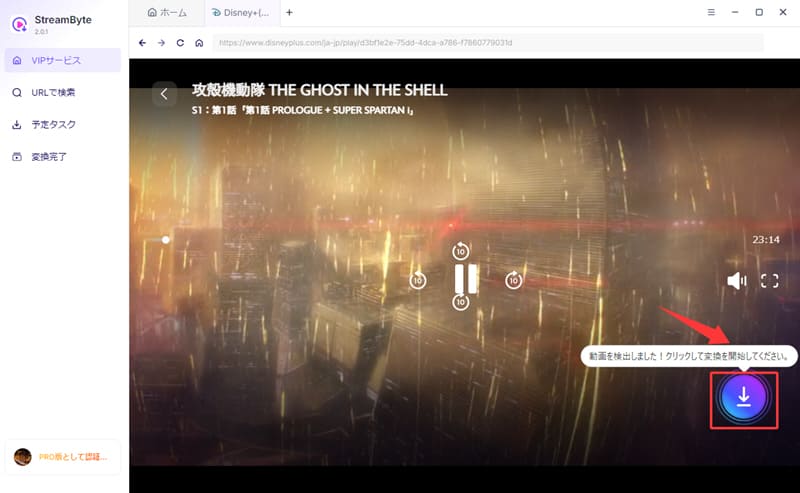
Step 2Search for the artwork you want to save and open its page. Click the "Add to Download" button on the screen to add the artwork to your download list.
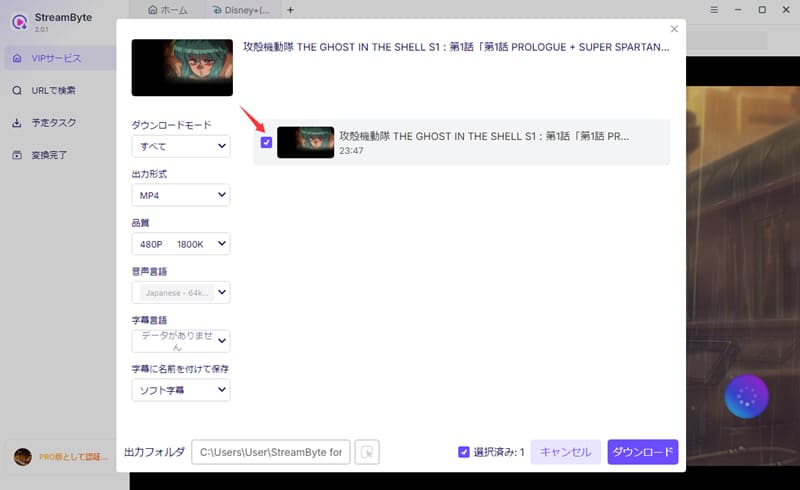
Step 3Then, on the download settings screen, adjust the save format, audio track, subtitle language, etc., as needed. Once the settings are complete,"Download" buttonClick to start the process.
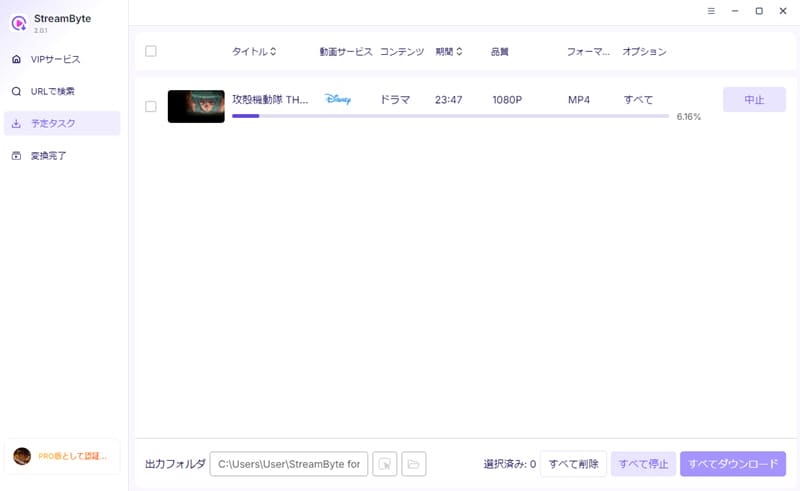
Step 4The download progress is"Scheduled Tasks" screenYou can check it there. Once the process is complete, the video will be saved to your computer.Enjoy Disney+ offline playback freely.You will be able to do so.
"StreamByte for VideoUsing this software, you can save Disney+ content in high quality. Its powerful DRM removal feature means you don't have to worry about the screen going black like when recording with OBS. You can save Disney+ content with virtually no loss of quality, and it's incredibly easy to use, even for beginners. If you're having trouble recording, definitely give this software a try.
100% safe, virus-free
100% safe, virus-free
| OBS Studio | Smartphone's standard recording function | Capture card | Extensions | StreamByte for Video | |
| Supported Devices | PC | smartphone | Game consoles and PCs | browser | computer |
| Difficulty | expensive | low | expensive | usually | low |
| additional equipment | Unnecessary | Unnecessary | need | Unnecessary | Unnecessary |
| Time required for recording | long | long | long | long | short |
| save speed | slow | slow | slow | slow | Up to 8x speed |
| image quality | Slightly expensive | usually | Slightly expensive | usually | 4K/Full HD compatible |
| cost | cost | free | Paid | Some content requires a fee. | Some content requires a fee. |
| Stability | expensive | usually | expensive | Normal to slightly unstable | expensive |
| Versatility | expensive | low | low | expensive | expensive |
| Recommendation | ★★★★★ | ★★★☆☆ | ★★★☆☆ | ★★★★☆ | ★★★★★ |
To clearly compare the advantages and disadvantages of each method for recording content on Disney+, we have summarized them in the table above.
If you prioritize high image quality, flexibility in settings, and ease of use, OBS Studio's recording function is suitable. If you only have a smartphone and want to record easily, the smartphone's standard recording function is the best option. Also, when recording Disney+ from a game console, using a capture card is the most stable option compared to other methods.
Furthermore, if you are looking for a more versatile method that requires relatively little effort to operate, there is a dedicated tool called "StreamByte for VideoAnother option is to use software like the one mentioned above. This tool is highly recommended because, compared to the recording methods described above, it not only avoids the problem of the screen going completely black, but also maintains high image quality and saves a significant amount of time.
Recording content from Disney+ is illegal and may violate copyright law and terms of service. However, it is generally considered that recording content for personal enjoyment is less likely to cause problems. On the other hand, commercial use or redistribution carries the risk of copyright infringement, so be sure to check the laws and terms of service in your area before using the content.
Most Disney+ content is DRM protected, so regular recording software or functions cannot properly save the video portion, resulting in a black screen. Therefore, if you want to save Disney+ videos, you will need software that can remove DRM protection.StreamByte for Video" is recommended.
It's generally unlikely that simply recording Disney+ content will be officially acknowledged. However, redistributing recorded content online or using it commercially carries the risk of copyright infringement. Therefore, please enjoy recorded content only for personal use.
This article has provided a detailed explanation of four methods for recording Disney+ content. Each method has its advantages and disadvantages, but it's important to note that most Disney+ content is DRM-protected, and even if you successfully record it, the screen may turn completely black. Therefore, as a fundamental solution for when recording fails,StreamByte for VideoWe introduced "[...]."
This software allows you to easily bypass Disney+'s DRM protection, enabling you to fully save content that would normally result in a black screen during recording. Furthermore, it significantly reduces recording time compared to recording and saving manually, and the saved videos remain in high quality. The operation is extremely simple, allowing you to save Disney+ content in just a few steps.
"StreamByte for Video"forFree trialThis is also available, so if you're having trouble recording Disney+, please give it a try.
100% safe, virus-free
100% safe, virus-free
Born in Tokyo in 1997. After graduating from a university in London, he worked at a major IT media company, writing articles about video streaming services, video downloaders, and digital content.More than 3 years of experience in editing, proofreading, and writing directionThe articles he has worked on have garnered over 5 million page views, and he is well-known for producing content that is carefully crafted from the reader's perspective.
Currently, as an editor and web writer at StreamByte, he works on creating articles that help users solve their problems, focusing on information related to video streaming services and downloads, with the aim of being "user-oriented, easy to understand, and immediately useful."
Read more articles together
Experts in supporting offline viewing of streaming video services
Subscribe to StreamByteCopyright © 2026 StreamByte. All rights reserved.



Get the latest news, product upgrades, information, guides, discounts and more about StreamByte.
Please enter a valid email address.

A highly capable video downloader:
StreamByte for Video
Even beginners can rest assured! You can try saving videos for free first!







 English
  Japanese
  Chinese (traditional)
  German